GBDB: A database for Nintendo GameBoy Opcodes
Intro & Problem Statement#
Recently I’ve taken an interest in emulation and home-brew development for the original Nintendo GameBoy. I chose the beloved grey brick as a starting point for emulation for a few reasons:
- Relative simplicity of the system. It certainly didn’t feel simple when I first started looking at it, but compared to consoles of today the GameBoy is very lightweight. In terms of specifications, the GameBoy has an 8-bit CPU, a 16 bit address bus, 8 KB each of Work Ram and Video RAM, and a 160x140 pixel screen. I/O, sound, and LCD screen are all memory mapped, meaning that reads/writes in certain areas of the memory space will give information about or affect these peripherals.
- Strength of the community. The GameBoy home-brew community has been going strong since at least 1995, when the original version of the PanDocs, a collection of technical documentation on the hardware of the GameBoy, was started. The community has done an incredible work of documenting the behaviour of the system and creating tool chains to allow for development on it, such as GDBK2020 or RGBDS. See the appendix for some neat examples.
- GameBoy games were the first video games I owned, and the first really interesting glitches I encountered were on the Pokemon games. Hearing rumours about things like the mew glitch or seeing the garbage displayed when visiting a glitch city piqued my curiosity: what exactly is going on here? What would cause this machine to misbehave in such a way? Starting this project, I felt like I had the tools needed to get a deeper understanding of this phenomena.
The character map becomes the territory
Getting way off into the weeds, I decided that I would possibly give coding a GameBoy emulator a try. Grossly oversimplifying, the GB CPU is running the following loop
- Check for any interrupts, and if they exist, run the handler code
- Fetch the next instruction
- Decode it
- Execute it.
I decided that the CPU would be the starting point of my emulator, and I started looking into breakdowns of the instruction sets. I came across two excellent tables which give an overview of all of the codes and their actions on the CPU:
These were instrumental to my learning, however I found I had questions where I needed to consider the opcodes by more than just their first and last nibbles. For example, how many load operations are there that are 1 byte in length? How many opcodes impact the half carry flag? A database would be better suited for this sort of querying. So I made one.
DB Design and Diagram#
I chose MariaDB for my DB server as it is free, and easy to use. This was my first time designing a database: in my day to day the DB’s I encounter have all been ossified in production. After thinking on it some, here was the object-relationship diagram that I came up with, based on the following observations/classifications.
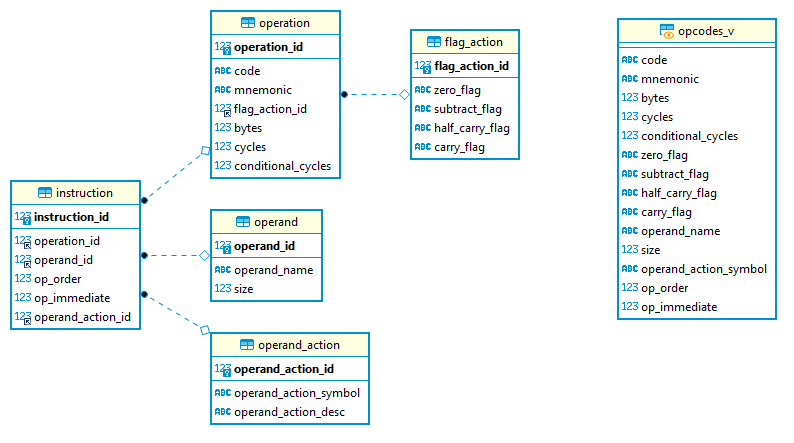
Entity Relationship Diagram for GBDB
- An operand is something that we act on as a part of a CPU operation. This can be an 8 or 16 bit register, or some sort of data, whether it be immediately following the instruction or otherwise. This table provides information on the different types of operands, and their sizes.
- An operation is some action that the CPU can take on data present in the GameBoy.
- A flag action is some combination of actions that can be taken on the CPU flags. This was separated from the operation table as different operations can impact the flags in the same way. In fact there are only a few mnemonics that have different actions on the flags that depend on the type of operand given, something which was very easy to see after the database was set up.
- An instruction is a combination of an opcode with its operands. This gives things like the order of operands, if this operand is implied by the opcode, or if it is immediate (IE will be read as the next byte by the CPU), as well as if there are any special actions to be taken on an operand as a part of processing.
- An operand action is a special sort of action that takes place on an operand after the CPU executes an instruction, like an increment or a decrement. Although not that common in the instruction set, these operations are really useful when writing loops in assembly.
- Finally opcodes_v is a view on all of this data to make things a bit easier to read.
More table details:
Instruction
- instruction_id: PK for operation to operand mapping
- operation_id: The operation for this particular instruction
- operand_id: An operand taken by this instruction
- op_order: numeric value specifying if the operand is the first or second one to the operation
- op_immediate: boolean specifying if the instruction is read memory, or is implied by the instruction
- operand_action_id: FK for operand action
Operand
- operand_id: PK for operands
- operand_name: Name, what you would see in one of the opcode tables
- size: how many bytes we need to read to get this operand
Operation
- operation_id: PK for operation
- flag_action_id: FK for the action of this operation on the CPU flags
- operation_code: The hex code for this operation
- mnemonic: The mnemonic for an operation that you’ll see in the opcode tables
- operation_bytes: The total number of bytes of the operation and its operands
- cycles: The number of machine cycles the operation takes by default, or if the operation is a conditional the number of cycles taken in the true branch
- conditional_cycles: If the operation is a conditional, the number of cycles taken in the false branch
Flag Action flag_action_id
- z : Action on the z(zero) flag
- n : action on the n(subtract) flag
- h : operation on the h(half carry) flag
- c : operation on the c(carry) flag
Operand Action
- operand_action_id: PK for operand action
- symbol : Shortcode as found in the gbdev.io json. Contains either + or -
- description : Short description of the action
Populating the DB#
The DB is populated by a Python script, DBPopulator. This reads the opcode data in a JSON format that’s stored on the gbdev.io website, parses it, determines any relationships between the data (this is used when populating the operation and instruction tables) and finally inserts it.
Setting up an instance#
The source code can be found here. These steps were tested on a fresh install of Ubuntu 20.04.2 LTS and Python 3.8.5
- Install MariaDB on your computer. You can follow the steps here. The rest of the steps that follow assume that there is no password for the root user on the DB.
- Install the required dependencies, if you don’t already have them
sudo apt install libmariadb3
sudo apt install libmariadb-dev
sudo apt install python3-pip
sudo pip install mariadb
- Copy the repository to your preferred workspace (here in the example this is ~/Documents/workspace, but this can be changed to whatever).
cd ~/Documents/workspace/
git clone https://github.com/csimpson1/gbtools.git
- Finally, to setup the database
cd ~Documents/workspace/gbtools/gbdb
sudo mysql -u root <./create_opcodes_db.sql
sudo python3 DBPopulator.py
Future Work#
One area where this could be expanded is in creating proper logins, roles, and permission on the database. This is not production ready, but is fine for home use depending on how comfortable you are with just a root login to this DB. Indices are not needed at this size, but if I were to expand this to include say opcodes for other systems I would add them in. A final thing which would be helpful is a proper install script. This isn’t something that I have experience making, but it would certainly make the process simpler and less error prone.
Appendix#
Some worthwhile examples of things done by the GB Home-brew and Emulation Community:
-
Analysis of the GB Boot ROM. This is the program that runs when you turn on the GameBoy, displaying the Nintendo Logo as well as making the beloved “ping!” sound. This ROM also acts as a form of copy protection for the GameBoy by checking to see if the cartridge contains a copy of the Nintendo Logo. Because this is a copyright, the idea was that this would allow for Nintendo to sue in cases of unauthorized usage, like including the logo to get an unlicensed or pirated ROM running on real hardware. It This was achieved by decapping and staining the one of the chips inside the GB, allowing for the boot ROM to be read off, bit by bit under a microscope. More information on how the GB boot ROMS were unlocked can be found here, an in-depth analysis of the boot ROM for the original GameBoy can be found here, and an interesting legal case (though in the context of trademarks, and not copyrights) where SEGA deployed a similar form of copy-protection can be found here.
-
Crazy demos such as these
-
Emulating obscure peripherals like a sonar attachment and a sewing machine (!). As an aside, the whole Edge of Emulation Series (two articles of which are linked above) is worth reading as a good introduction on techniques that can be used to reverse old consoles and their peripherals.